Today, in our special post, we see how to create a basic paint software in Lazarus with some basic drawing tools and Open, Save, Resize options. A must see for Lazarians!
Painting is a fun exercise of creativity. People form kids to professionals like to draw something just to have fun. Creating a drawing software is more fun than drawing (at least to me ;-) ). As the 50th post of LazPlanet, I am honored to present to you a simple paint software code made in Lazarus (Free Pascal). Enjoy!
This project answers the following questions:
- How to open an image in a canvas?
- How to create a pencil tool to draw in a canvas (for scribbling)?
- How to create a line tool for drawing lines?
- How to create a (Color) Flood Fill tool?
- How to create a toolset with toggling buttons?
- How to create a color picker tool?
- How to make the tools work with the selected color?
- How to make the tools work with the selected border/pen width?
- …and many more according to how used to coding you are.
The tools in the software are:
- Pencil tool
- Line tool
- Rectangle tool
- Circle tool
- Triangle tool
- Color dropper tool
- Flood Fill (Color) tool
The toolbar buttons are:
- New Image
- Open Image
- Resize Canvas
- Paste Image from Clipboard
- Save Image As
* The software only supports Bitmap files (.bmp). But you can extend the support by adding code for working with .jpg, .gif, .png, .ico etc.
I sure had fun making it. And while making I understood again that how Lazarus / FreePascal is helpful in making modern day graphical applications.
Now I want to share my enjoyment with you.
Oh! And you can also check out this post : How to scribble with a virtual pencil to have a knowledge on drawing on a virtual canvas that the computer offers. It will certainly make this project seem easier to you. It also has an excellent explanation of how to draw something when the user drags the mouse cursor.
Quick Tutorial
This is a big project having a slightly bigger collection of components. So I will discuss in brief about the creation process, so that this post does not become gigantic to swallow for Lazarians.
Form Design and Properties
Start Lazarus.
Here is a screenshot of the components’ names and their type straight from the Object Inspector.
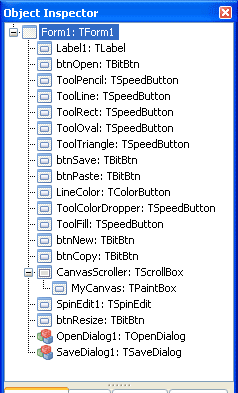
That seems to be a lot of components! But remember the impressive result that you will get after doing such a hard work is worth it. (Plus, keep imagining what the Photoshop and Gimp programmers has done for those software! They are indeed hard workers.)
Add those components and name them according to the screenshot. Here is a screenshot of the form’s design view to make positioning the components easier for you:
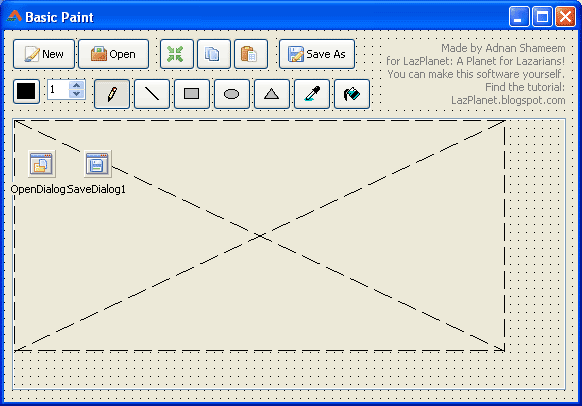
Use appropriate Glyphs/Icons for the toolbar icons. (I have used icons from Silk Companion and famfamfam Mini Icons collection. I have used these because they free for any project, even commercial ones. Cool, right?) I have included the icons that I have used in the sample code zip file available from below this article. They are in the “icons4u“ folder.
![]()
Now we would make the tools’ buttons to toggle on click. Have you noticed that when you select a tool in a drawing software (such as MS Paint/Gimp/Photoshop/Illustrator etc.) another tool gets de-selected. Select all the Tool Buttons and set its GroupIndex to 1. Select the first tool (Pencil tool SpeedButton). Set its Down property to True.
Select the TScrollbox. Make its HorzScrollBar -> Tracking and VertScrollBar ->Tracking to True. This will smoothen the scrolling of the canvas when its bigger than the ScrollBox‘s area. Set its Anchors -> AkBottom and Anchors -> AkRight to True. This will resize the ScrollBox with the form resize. Set its Color to clAppWorkspace.
You have created the TPaintbox inside the TScrollBox, right? If you haven’t done so, then right click the TPaintbox/MyCanvas and select Change Parent -> CanvasScroller / TScrollbox. Then set its Left and Top to 0 (zero).
Set the “Value“ and “MinValue“ property of TSpinButton to 1.
Set Filter property of both OpenDialog1 and SaveDialog1 to:
1 | Bitmap Files (*.bmp)|*.bmp |
Without further ado let’s get to coding–
Coding
Before proceeding with code, add these units to the uses clause: Clipbrd, LCLIntf, LCLType.
1 | uses |
These are for using the clipboard.
Declare some variables after the line “Form1: TForm1;“:
1 | paintbmp: TBitmap; |
paintbmp is our “virtual” canvas in which we will draw things. We will draw this exact TBitmap on TPaintBox‘s OnPaint event. If we don’t do this, the TPaintbox will be blank when we move the window or resize it. MouseIsDown variable is to determine whether the user has the mouse button pressed or not not. If yes, we’ll draw, otherwise won’t. PrevX and PrevY is where the user started the drag (on the canvas).
TIP: You may have to use Toggle Form/Unit button on the toolbar or press F12 to switch between Code and Form view.
Select MyCanvas and go to Object Inspector -> Events -> OnPaint -> […] and enter:
1 | procedure TForm1.MyCanvasPaint(Sender: TObject); |
Again go to Object Inspector -> Events -> OnMouseDown -> […] and enter:
1 | procedure TForm1.MyCanvasMouseDown(Sender: TObject; Button: TMouseButton; |
Again go to Object Inspector -> Events -> OnMouseMove -> […] and enter:
1 | procedure TForm1.MyCanvasMouseMove(Sender: TObject; Shift: TShiftState; X, |
Again go to Object Inspector-> Events-> OnMouseUp-> […] and enter:
1 | procedure TForm1.MyCanvasMouseUp(Sender: TObject; Button: TMouseButton; |
Double click btnNew and enter:
1 | procedure TForm1.btnNewClick(Sender: TObject); |
Double click btnOpen and enter:
1 | procedure TForm1.btnOpenClick(Sender: TObject); |
Double click btnResize and enter:
1 | procedure TForm1.btnResizeClick(Sender: TObject); |
Double click btnCopy and enter:
1 | procedure TForm1.btnCopyClick(Sender: TObject); |
Double click btnPaste and enter:
1 | procedure TForm1.btnPasteClick(Sender: TObject); |
Double click btnSave and enter:
1 | procedure TForm1.btnSaveClick(Sender: TObject); |
Select the LineColor (TColorButton) and go to Object Inspector -> Events -> OnColorChanged -> […] and enter:
1 | procedure TForm1.LineColorColorChanged(Sender: TObject); |
Select the SpinButton1 (TSpinButton) and go to Object Inspector -> Events -> OnChange -> […] and enter:
1 | procedure TForm1.SpinEdit1Change(Sender: TObject); |
Double click on the form to create a procedure for OnCreate event. Now enter the code below (the code will run on startup):
1 | procedure TForm1.FormCreate(Sender: TObject); |
Select the form. Then go to Object Inspector -> Events -> OnClose -> […] and enter the code below (This will run when the user exits the software):
1 | procedure TForm1.FormClose(Sender: TObject; var CloseAction: TCloseAction); |
Run it!
Run the project (F9 or Run -> Run).
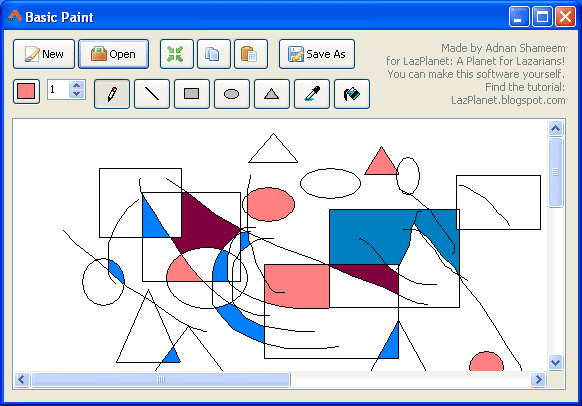
Now, do your thing! Create your next masterpiece!
Further Practice
You can improve the code / project further by adding following features:
- Multiple format support (.jpg, .png, .gif, .ico, .tif and more) Look here for how to
- Gradient tool, Crop tool, Polygon tool, Eraser tool, Curve tool
- Drawing by angle when Shift is pressed while drawing
- Selection tool (Rectangle, Circle, Polygon, FreeHand)
- Moving the selection area
- Magnifier tool
- Undo, Redo options
- Filters
You can create practically a second Photoshop if you want!
Downloads
You can download the source code for the tutorial project and executable/EXE files from the links below:
