Drawing is fun. Learn how to create a drawing software that can let the user draw like a pencil in a virtual canvas in his computer screen. We are also going to use colors!
If you have a piece of paper and a pencil and loads of time to waste, what would you do? You will scribble. You will draw random shapes and lines in that piece of paper. That’s what you are going to do today in your own program. Plus, you will find out the secrets how the computer draws what you draw!
It is much like using the Pencil tool in MS Paint.
Quick Tutorial
Start Lazarus.
Create a new Application project (Project -> New Project -> Application -> OK).
Create a TColorButton and a TSpinEdit (both from Misc tab) and a TButton. You can also use a TBitBtn instead of TButton, to use an icon for the button. It is a graphics application, you know. But it is upto you. Also, create a TPaintbox. Then select the TButton and set its Name property to btnNew. Add TLabels and set Captions as you desire. Your form layout may resemble the following:
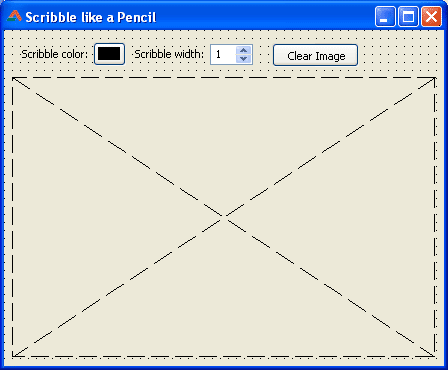
Set the MinValue and Value of SpinButton1 to 1. You can set the AkBottom and AkRight of PaintBox1 -> Anchors property to True for sizing the Paintbox in resize event.
Switch to Code View (F12) and add these variables under the first var clause at the top:
1 | paintbmp: TBitmap; |
Add the code below to Paintbox1‘s OnPaint event. (Select Paintbox1 then go to Object Inspector -> Events -> OnMouseDown -> […] and enter:)
1 | procedure TForm1.PaintBox1MouseDown(Sender: TObject; Button: TMouseButton; |
Similarly, in the OnMouseMove event:
1 | procedure TForm1.PaintBox1MouseMove(Sender: TObject; Shift: TShiftState; X, |
In the OnMouseUp event:
1 | procedure TForm1.PaintBox1MouseUp(Sender: TObject; Button: TMouseButton; |
In the OnPaint event:
1 | procedure TForm1.PaintBox1Paint(Sender: TObject); |
Select ColorButton1 and add the code in the OnColorChanged event:
1 | procedure TForm1.ColorButton1ColorChanged(Sender: TObject); |
Select SpinEdit1 and add code to the OnChange event:
1 | procedure TForm1.SpinEdit1Change(Sender: TObject); |
Double click btnNew and enter:
1 | procedure TForm1.btnNewClick(Sender: TObject); |
Double click the form and enter:
1 | procedure TForm1.FormCreate(Sender: TObject); |
Add the code below on the Form’s OnClose event:
1 | procedure TForm1.FormClose(Sender: TObject; var CloseAction: TCloseAction); |
We need to Free the TBitmap because it has been Create-ed. Remember to always Free anything in your code when you have used Create() function. If you fail to do that, you will face Memory Leak. So beware!
Now Run it (F9 or Run -> Run).
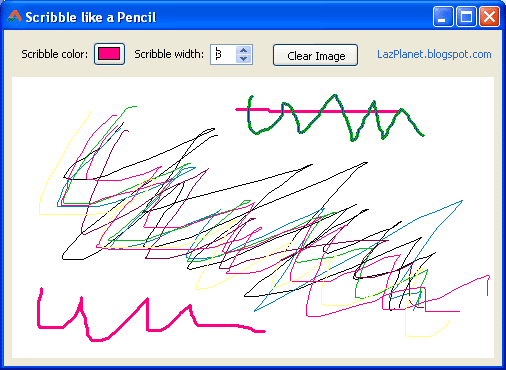
Explanations:
In the btnNew‘s OnClick event:
1 | procedure TForm1.btnNewClick(Sender: TObject); |
We create a new canvas in the size of the screen. So that the user does not have to deal with a small canvas. The user gets extra space when he resizes.
After creation the canvas is all black. We don’t want a dark canvas. So we draw a filled rectangular area with white color (FillRect). The default Canvas.Brush.Color is white, so we don’t have to set the color.
Why we draw on two canvases?
There is a problem of drawing. If you draw something in a Canvas of a Component (such as we plan to draw in the Paintbox1.Canvas) then when it is repainted the drawn image gets erased. The component is repainted on the screen when it is resized or visually changed.
To eliminate the problem we have to draw the same image every time when the component is redrawn. That’s why we have created a TBitmap (paintbmp) and drawn on it. All the drawings made on the Paintbox1 is also being made on paintbmp. So whenever Paintbox1 is repainted, we draw the paintbmp on the its Canvas. Look at the code below:
1 | var |
To create a virtual pencil work is a hardwork in computers. Do you think these drawings are made by dots? No! Well yes, technically. But from our perspective it is not drawn with dots. It is actually drawn with lines. Everytime the mouse is moved a line from the previous pixel / point is drawn, making it a series of lines to emulate a pencil stroke.
First, lets look at how a line tool works. When the user presses the mouse button (OnMouseDown event) 2 variables store the X and Y position where the mouse was down. (Assume they are PrevX = X and PrevY = Y.). When the mouse is up a line is drawn from the point (PrevX, PrevY) to point (X, Y).
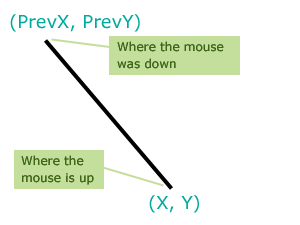
In the case of Pencil tool, we just have to update the PrevX and PrevY in the OnMouseMove event. So that we get a path of the mouse position where the cursor has been going.
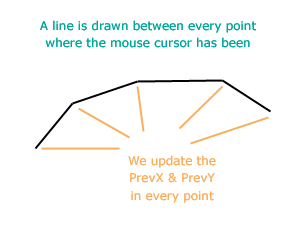
We have to keep updating the PrevX & PrevY just after we have drawn a line.
1 | procedure TForm1.PaintBox1MouseMove(Sender: TObject; Shift: TShiftState; X, |
In the case of Pencil tool a line has to be drawn in the MouseMove event. So we should also update the PrevX & PrevY values.
Take a look at Developing with Graphics wiki article for a better understanding of graphical magic tricks!
Downloads
You can download the source code for the tutorial project and executable/EXE files from the links below:
