Alarm clocks are simple but very useful in our daily lives, right? How about if we make our own?
I work on my computer very often. So it gets easy for me to forget things. I need alarm clocks to remind me of time sensitive things. It might be simple as reminding me to turn of the stove after the water gets boiled, to feed the pet, water plants etc. Alarm clocks are handy for me.
Like me, I think you have many uses for one too. So today let’s see how we can create an alarm clock in Lazarus.
The concept is simple. If we break it down a little bit an alarm app does these 2 basic things:
- Keep a list of alarm times
- Check if it is time to ring any of the listed alarms
Really easy, right?
So let’s get our hands dirty with a simple version of the alarm…
Basic Tutorial
Start Lazarus.
Create a new Program project (Project - New Project - Application - OK).
Create this simple layout:
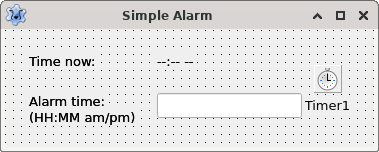
Just draw a TLabel, a TEdit and a TTimer (from System tab). They’ll probably be named Label1, Edit1 and Timer1 consecutively. Empty Text property of Edit1 and set --:-- -- as Caption of Label1. Optionally, set Caption property of Form1 to something like “Simple Alarm“. You can also set Project - Project Options - Project Options - Application Settings - Title to Simple Alarm.
Then draw as many TLabels as you want to indicate what element does which. Let them take any name that comes in automatically. In this case two TLabels for “Time now:” and “Alarm time:” are what you’d want to create.
Now double click Timer1 and enter:
1 | procedure TForm1.Timer1Timer(Sender: TObject); |
Now press F9 (or Run - Run) and input a time for your alarm. Be cautious to follow the exact format (HH-MM am/pm). e.g. “08:45 pm”. Then wait.
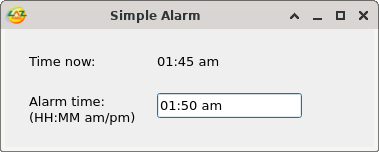
It should show a message when it hits the time you entered. After you click OK the program will close itself.
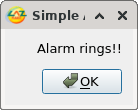
It is as simple as that.
But it would be nice if we could have multiple alarms and inputs could be little easier. That’s why we’ll be making an advanced version of an alarm clock next…
Tutorial
Start Lazarus.
Create a new Application project (Project - New Project - Application - OK).
Draw TLabel, TListBox, TBitBtn (from Additional tab), TTrayIcon (from Additional tab), TTimer (from System tab) components like the screenshot below:
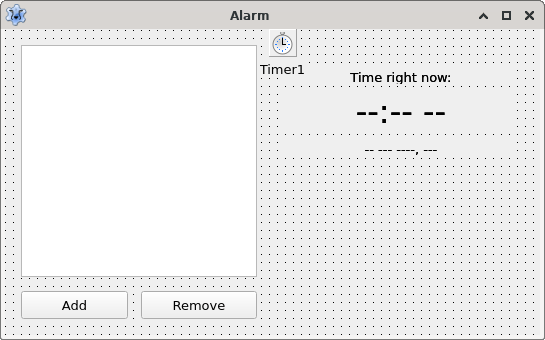
Set the Name property of the TListBox to lstAlarms, one TBitButton to btnAdd and another to btnRemove. Set Name of the second TLabel to lblTime and the third one to lblDate.
Set Caption property of TLabels and TBitBtns according to screenshot. Set AutoSize property to False and Alignment to taCenter for TLabels, then resize them to same size. This is so that the TLabels stay center.
Set MultiSelect property of lstAlarms to True to allow selecting multiple items and remove them at once. Set Font -> Size property of lblTime to 24. Set Interval property of Timer1 to 5000. Set BalloonHint to Alarm and Visible to True for TrayIcon1.
Optionally, you can set the Glyph property of TBitBtns and Icon property of TTrayIcon. I found CC0 licensed icons from Aiconica and resized to 16px x 16px size (convert input.png -background transparent -resize 16x16 output.png or ffmpeg -i input.png -pix_fmt rgba -s 16x16 output.png) and used them. The files are included in the images directory in the project source code. But you can use other ones as you wish.
Double click Timer1 and enter:
1 | procedure TForm1.Timer1Timer(Sender: TObject); |
The above is the lifeblood of this project. It shows the time, date and most importantly rings the alarm when the time is detected to be alarm trigger time.
Switch to Form View (F12) and double click the form and enter:
1 | procedure TForm1.FormCreate(Sender: TObject); |
The LoadFromFile command will load the file alarmlist.dat into lstAlarms. You can use '/' instead of DirectorySeparator. But this is the proper solution because it changes according to platform (e.g. becomes \ on Windows and / on Linux distros or Unix).
Timer1Timer(Sender); just calls the Timer1’s OnTimer procedure. This is so that the time display gets updated on launch of our app.
Now on Object Inspector, go to Events and click on […] button beside OnClose and enter:
1 | procedure TForm1.FormClose(Sender: TObject; var CloseAction: TCloseAction); |
This is to save the alarms users created to alarmlist.dat file so that the app can load it when it launches next time.
Click […] button next to OnWindowStateChange and enter:
1 | procedure TForm1.FormWindowStateChange(Sender: TObject); |
This gives you a nice feature that when you minimize the form it hides itself and gets out of your workflow. We have a TTrayIcon to show a little tray icon while it is minimized. Now we want to make the form visible again when the form is unminimized. So, switch to Form view (F12), double click TrayIcon1 and enter:
1 | procedure TForm1.TrayIcon1Click(Sender: TObject); |
Now we’ll create our second form for setting alarms. Go to File - New Form. We had Unit1 for Form1 before. After this, a new form will be created named Form2 and with it a new unit file called Unit2. A little tip. You can click Project - Forms (Shift+F12) to switch between forms if other ways of navigating between forms is not working for you. You can then use F12 to switch to code view for that form.
Now find the implementation clause on Unit1 (you should find a tab on source editor, or if not, Ctrl+F12, double click Form1, F12) and make it look something like this:
1 | implementation |
Now we will be able to use Form2’s components in our code in Form1. With that out of the way let’s create components on Form2. Here is a screenshot of the components for Form2:
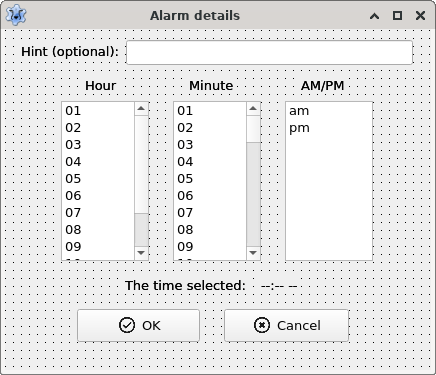
Create 1 TEdit, 3 TListBoxes, 1 TLabel and 2 TBitBtns. Set Name property of the TEdit to edtHint; TListBoxes to lstHour, lstMinute and lstampm; TLabel to lblTimeHint, 2 TBitBtns to btnOK and btnCancel. Add other TLabels as needed and change Caption properties to make your form look similar to the above screenshot.
Select lstHour and set it’s Items property to:
1 | 01 |
Select lstMinute and set it’s Items property to:
1 | 01 |
Select lstampm and set it’s Items property to:
1 | am |
Select the form (Form2), go to Object Inspector - Events and click […] beside OnShow and enter:
1 | procedure TForm2.FormShow(Sender: TObject); |
This basically prepares the form for the user. Don’t you hate it when alarm apps just choose the first hour, minute etc. in the input? So we select the current hour, minute etc. so that user can easily adjust from there. We also empty the hint input.
We’re using FormatDateTime() to create a timestamp string of current time with | in middle of different parts. That’s on purpose. We use that | (pipe character) to split the string into different elements. We then use these elements for setting selection of each element to appropriate input. StrToInt( parts[0] ) - 1 is just a clever way to convert the current hour value to list index number. Index numbers are zero based, so we subtract 1 from hour value. StrToInt( parts[1] ) - 1 is similar but just for the minute.
Pay attention that we’re using the OnShow event instead of OnCreate (which is created by double clicking the form), because OnCreate event runs on project startup. But OnShow runs everytime we show the form, meaning everytime the user will click the Add button. If we ran the above commands on OnCreate the hint would just empty on project startup and everytime user clicks add it would show the last input. By using OnShow we’re emptying that every time the Form2.Show is run. Same with time inputs. We update the time selection every time the form is shown.
Now we look to update the time hint label when the user selects a time.
Switch to form view (F12) and select lstHour, go to Object Inspector - Events and click […] beside OnSelectionChange and enter:
1 | procedure TForm2.lstHourSelectionChange(Sender: TObject; User: boolean); |
Now select lstMinute and lstampm and enter lstHourSelectionChange in the input beside OnSelectionChange.
We got most of the functionality done for Form2. We just have the OK and Cancel buttons to cover. That’s easy. Just double click btnOK and enter:
1 | procedure TForm2.btnOKClick(Sender: TObject); |
Then double click btnCancel and enter:
1 | procedure TForm2.btnCancelClick(Sender: TObject); |
When we show Form2 from Form1 and when user clicks either OK or Cancel, we need a way to know from Form1 which button the user clicked. These are just a way of sending that information to Form1. Which will be clear in a minute…
Switch to Form1‘s form view (Shift+F12), double click btnAdd and enter:
1 | procedure TForm1.btnAddClick(Sender: TObject); |
So basically this is checking if the user clicked the OK button and adding the alarm if so.
Now run the project (Run - Run or F9).
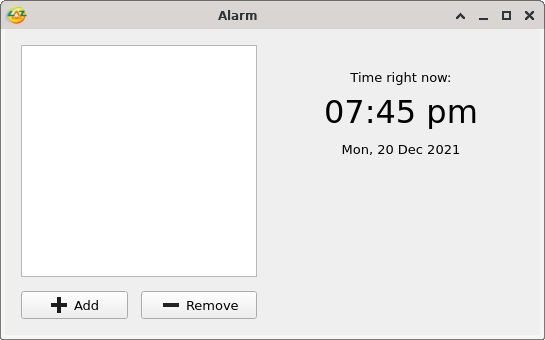
Click Add to create alarms.
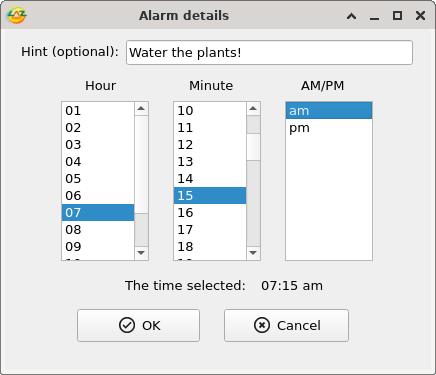
Play around to your heart’s content!
If you want to play a sound when your alarms ring, you can try this or any of the solutions that work for you.
Ref:
- Date and time formatting reference: https://www.freepascal.org/docs-html/rtl/sysutils/formatchars.html
Downloads
You can download the source code for the tutorial project and executable/EXE files from the links below:
